
Guide to Installing and Configuring NGINX
NGINX is typically used for three main purposes:
-
As a web server,
-
As a reverse proxy, or
-
For load balancing.
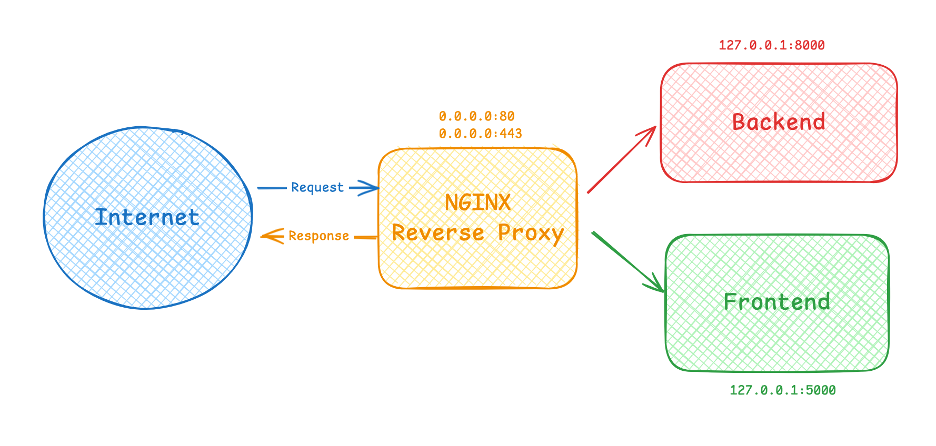
In my case, I mainly use NGINX as a Reverse Proxy, meaning NGINX acts as an intermediary that receives incoming requests from the Internet and forwards them to backend or frontend servers running on localhost.
I almost never run web services (either frontend or backend) bound directly to 0.0.0.0.
I. Installing NGINX
There are two common installation methods:
-
Configure the repository and install via yum/dnf/apt
-
Build NGINX directly from source
1. Method 1: Install via Repository (yum/dnf/apt)
Configure the repository on Ubuntu
echo "deb http://nginx.org/packages/ubuntu/ $(lsb_release -cs) nginx" | sudo tee /etc/apt/sources.list.d/nginx.list
curl -fsSL https://nginx.org/packages/keys/nginx_signing.key | sudo tee /etc/apt/trusted.gpg.d/nginx.asc
apt-get update
apt install nginx
Configure the repository on RHEL
tee /etc/yum.repos.d/nginx.repo <<EOF
[nginx]
name=Nginx Repository
baseurl=http://nginx.org/packages/rhel/\$releasever/\$basearch/
enabled=1
gpgcheck=1
gpgkey=https://nginx.org/packages/keys/nginx_signing.key
EOF

yum install nginx
Configure the repository on CentOS
tee /etc/yum.repos.d/nginx.repo <<EOF
[nginx]
name=Nginx Repository
baseurl=http://nginx.org/packages/centos/\$releasever/\$basearch/
enabled=1
gpgcheck=1
gpgkey=https://nginx.org/packages/keys/nginx_signing.key
EOF

yum install nginx
2. Method 2: Build NGINX from Source
This approach allows you to install any version of NGINX available on the official download page
Step 1: Install build dependencies
For Ubuntu:
apt-get update

apt install -y build-essential libpcre3 libpcre3-dev zlib1g zlib1g-dev libssl-dev wget
For RHEL/CentOS:
yum install -y pcre pcre-devel zlib zlib-devel openssl-devel wgetStep 2: Download and extract the source
Visit https://nginx.org/download/, pick the desired version, and run:
wget https://nginx.org/download/nginx-<version>.tar.gz


# Example:

wget https://nginx.org/download/nginx-1.28.0.tar.gz

tar -xvzf nginx-1.28.0.tar.gz
Step 3: Configure and Build
NGINX does not automatically create a default user during compilation.
It’s recommended to create a service account (non-login shell) for running NGINX processes.
useradd -r -s /sbin/nologin nginxConfigure build options and modules
You can run a simple ./configure to use defaults, but for production setups, it’s best to explicitly include required modules. Missing a module referenced in your configuration will cause NGINX to fail to start.
cd nginx-1.28.0

./configure \

--prefix=/etc/nginx \

--sbin-path=/usr/sbin/nginx \

--conf-path=/etc/nginx/nginx.conf \

--error-log-path=/var/log/nginx/error.log \

--http-log-path=/var/log/nginx/access.log \

--pid-path=/var/run/nginx.pid \

--lock-path=/var/run/nginx.lock \

--user=nginx \

--group=nginx \

[list modules]
Explanation of options
| Option | Description |
|---|---|
--prefix |
Default installation directory |
--sbin-path |
Path of the compiled binary (recommended to place under a directory in $PATH, so commands like nginx -v, nginx -V, nginx -t, and nginx -s reload work globally) |
--conf-path |
Main configuration file (typically /etc/nginx/nginx.conf) |
--error-log-path |
Error log file path |
--http-log-path |
Access log file path |
--user / --group |
Defines the system user/group to run NGINX worker processes |
Commonly used modules
-
HTTP Core:
-
--with-http_gzip_static_module(Gzip compression) -
--with-http_v2_module(HTTP/2) -
--with-http_ssl_module(TLS/SSL support — requires OpenSSL) -
--with-pcre(Regular expression support)
-
-
Stream modules:
-
--with-stream -
--with-stream_ssl_module
-
You can also include third-party modules using:
--add-module=[path-to-module]For example, adding Brotli (https://github.com/google/ngx_brotli)
Build and install
make -j "$(nproc)"
make install
Verify installation
nginx -v    # Check version
nginx -V    # Check compile options and modules
Create a systemd service
tee /etc/systemd/system/nginx.service <<EOF
[Unit]
Description=Nginx For Reverse Proxy
After=network.target

[Service]
Type=forking
PIDFile=/var/run/nginx.pid
ExecStartPre=/usr/sbin/nginx -t
ExecStart=/usr/sbin/nginx
ExecReload=/usr/sbin/nginx -s reload
ExecStop=/usr/sbin/nginx -s quit
PrivateTmp=true

[Install]
WantedBy=multi-user.target
EOF
Enable and start the service:
systemctl daemon-reload
systemctl enable nginx
systemctl start nginx
Check status:
systemctl status nginx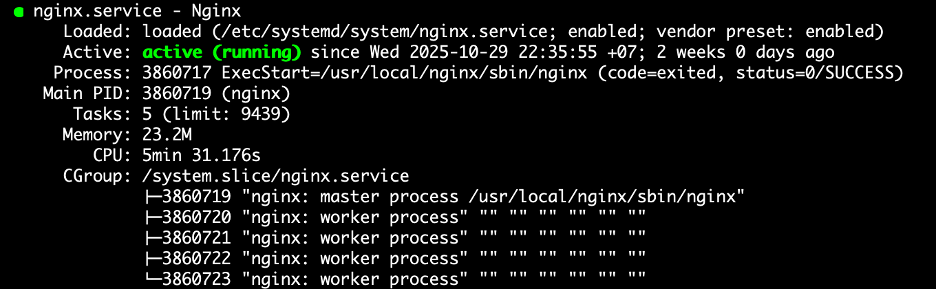
II. Configuring NGINX as a Reverse Proxy
I usually configure NGINX as a reverse proxy — it forwards requests from clients to backend servers and sends responses back.
File: /etc/nginx/nginx.conf
user  nginx;

worker_processes  auto;

error_log  /var/log/nginx/error.log;

pid        /var/run/nginx.pid;

events {

    worker_connections  1024;

}

http {

    include       /etc/nginx/conf/mime.types;

    default_type  application/octet-stream;

    log_format  main  '$remote_addr - $remote_user [$time_local] "$request" '

                      '$status $body_bytes_sent "$http_referer" '

                      '"$http_user_agent" "$http_x_forwarded_for"';

    access_log  /var/log/nginx/access.log  main;

    sendfile        on;

    keepalive_timeout  65;

    gzip  off;

    include /etc/nginx/conf.d/*.conf;

    # Enable Brotli Compression

    brotli on;

    brotli_static on;

    brotli_comp_level 6;

    brotli_types text/plain text/css application/javascript application/x-javascript application/json application/xml application/xml+rss image/svg+xml image/webp;

    #brotli_min_length 256; # Minimum length of the response to compress

}
Explanation of some key directives
-
keepalive_timeout:
Defines the maximum idle time (in seconds) before closing a client connection. -
include /etc/nginx/conf.d/*.conf:
Loads all configuration files from the specified directory. -
brotlimodule:
Enables Brotli compression (added via--add-module=https://github.com/google/ngx_brotli).
III. Reverse Proxy Example
File: /etc/nginx/conf.d/codevel.conf
(Note: For confidentiality, only part of the file is shown.)
server {

    listen 443 ssl;

    listen [::]:443 ssl;

    http2 on;

    server_name codevel.io;

    include self-signed.conf;

    location / {

        proxy_pass http://localhost:3000;

        proxy_http_version 1.1;

        proxy_set_header Upgrade $http_upgrade;

        proxy_set_header Connection 'upgrade';

        proxy_set_header Host $host;

        proxy_cache_bypass $http_upgrade;

        proxy_set_header X-Forwarded-For $remote_addr;

    }

}
Explanation
This server block is defined inside the main http block of nginx.conf.
-
listen:
The ports NGINX listens on to forward requests. -
server_name:
Defines which domain(s) the server responds to.
A single NGINX instance can handle multiple domains/subdomains. -
location:
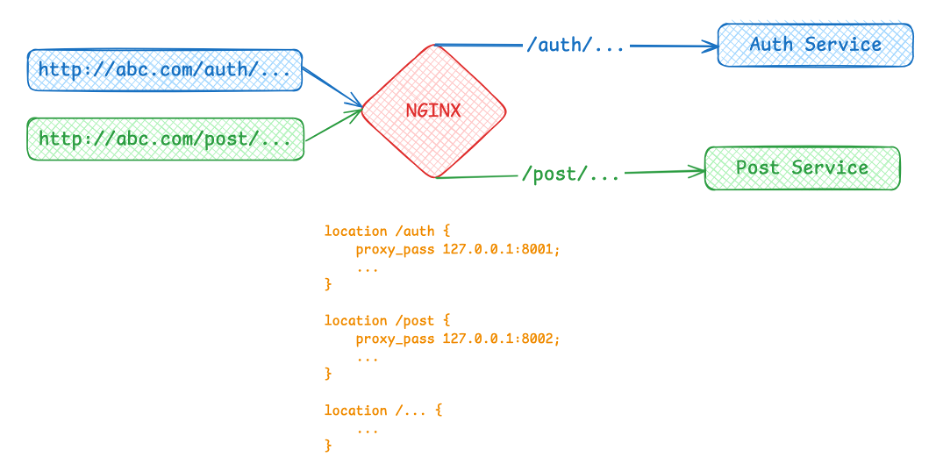
Specifies endpoint forwarding rules.
For example:-
auth-servicerunning on127.0.0.1:8001 -
post-servicerunning on127.0.0.1:8002
You can forward requests with
/authtoauth-service,/posttopost-service, etc., by defining multiplelocationblocks. -
IV. Understanding location Matching in NGINX
You might wonder:
Does the order of
locationblocks matter in NGINX configuration?
Answer: No.
NGINX doesn’t read from top to bottom — it searches through all location blocks and picks the longest matching prefix.
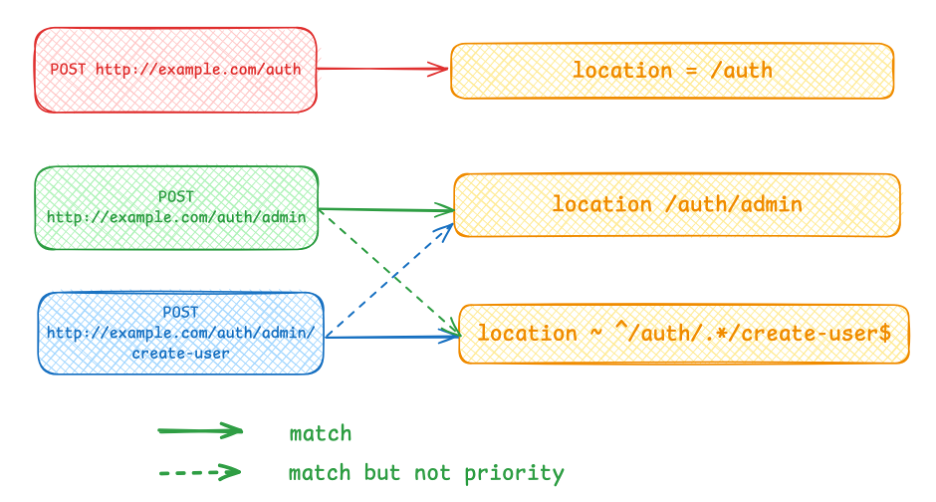
There are three types of location declarations, with different priority levels:
| Type | Syntax | Priority | Description |
|---|---|---|---|
| Exact match | location = /auth |
Highest | Matches only /auth; /auth/admin will not match |
| Prefix match | location /auth |
Medium | Chooses the longest prefix that matches the URI |
| Regex match | location ~ ^/auth |
Lowest |
Evaluated only if no prefix match applies |
Inside the location block
The directive proxy_pass defines the destination for the forwarded request.
Additional settings such as proxy_set_header, proxy_cache_bypass, etc., are optional tuning parameters.
V. Final Thoughts
That’s everything I wanted to share about NGINX installation and configuration.
If I find more useful details later, I’ll update this guide.
Feel free to share your feedback — I hope this tutorial helps you install and configure NGINX correctly for your applications.
See you in the next post!
Thanks for reading.